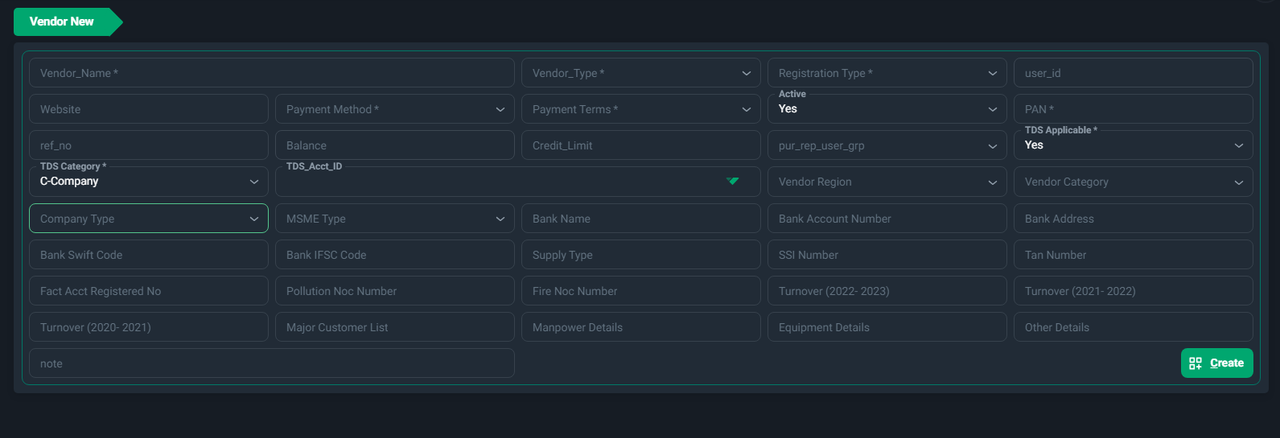
Adding a Vendor
The Vendor Module in Ace CBM provides a user-friendly and efficient way to manage vendor records. Adding a vendor ensures all vendor-related information, including financial, tax, and operational details, is accurately recorded and accessible for seamless business operations.
Steps to Add a Vendor
-
Access the Vendor Form:
- Navigate to the Vendor New section under the vendor section from the Ace CBM dashboard.
-
Fill in Basic Vendor Details:
- Vendor Name: Enter the name of the vendor (mandatory).
- Website: Provide the vendor's official website URL, if applicable.
- Vendor Type: Specify the type of vendor (e.g., supplier, contractor).
- Registration Type: Choose the appropriate registration type (e.g., GST registered, non-registered).
- Active: Set the vendor's status to "Yes" to activate their account.
-
Tax and Financial Information:
- PAN: Provide the Permanent Account Number for tax purposes (mandatory).
- TDS Applicable: Specify whether TDS (Tax Deducted at Source) applies to this vendor.
- TDS Category: Select the category applicable for TDS (e.g., Company, Individual).
- TDS Account ID: Input the corresponding account ID for TDS deductions.
- Balance: Enter the current balance with the vendor.
- Credit Limit: Define the maximum credit limit assigned to the vendor.
-
Payment Details:
- Payment Method: Choose the vendor's preferred payment method (e.g., Bank Transfer, Cash).
- Payment Terms: Specify the agreed payment terms (e.g., 30 days, 60 days).
-
Banking Information:
- Bank Name: Input the vendor's bank name.
- Bank Account Number: Provide the vendor’s bank account number for transactions.
- Bank Swift Code: Enter the SWIFT code for international payments.
- Bank IFSC Code: Specify the IFSC code for Indian transactions.
- Bank Address: Add the address of the vendor's bank.
-
Company and Compliance Information:
- Company Type: Specify the vendor's company type (e.g., Private Limited, Partnership).
- MSME Type: Indicate whether the vendor is a Micro, Small, or Medium Enterprise.
- Supply Type: Mention the type of supply (e.g., Goods, Services).
- TAN Number: Provide the Tax Deduction and Collection Account Number.
- Pollution NOC Number: Include the Pollution No Objection Certificate number if applicable.
- Fire NOC Number: Add the Fire NOC number if required.
-
Additional Details:
- Turnover Details: Enter turnover figures for the past financial years.
- Major Customer List: Include the vendor’s significant customers, if available.
- Manpower Details: Add information about the vendor’s manpower capacity.
- Equipment Details: Specify the equipment provided or utilized by the vendor.
- Notes: Add any specific details or instructions in the Note field.
-
Save the Vendor Details:
- Once all fields are filled and verified, click Create to save the vendor information.
Viewing the Vendor List
The Vendor List module in Ace CBM provides a centralized view of all vendors, making it easy to access, review, and manage vendor information. This tool supports quick search, filtering, and detailed insights, ensuring businesses can maintain strong vendor relationships and streamline their procurement processes.
Features of the Vendor List
-
Comprehensive Vendor Records:
- Account ID (acct_id): Unique identifier for each vendor.
- Vendor Name (vndr_name): Displays the registered name of the vendor.
- Vendor Type (vndr_type): Specifies the category of the vendor (e.g., AP General, Raw Material).
- Website: Provides the vendor's official website link (if available).
- Payment Method (pmt_mthd): Indicates the preferred payment method (e.g., Cheque, Transfer).
- Registration Type (reg_type): Shows the vendor’s registration status (e.g., GST Registered).
-
Tax and Compliance Details:
- PAN: Displays the Permanent Account Number of the vendor.
- TDS Applicable: Indicates if Tax Deducted at Source is applicable to the vendor.
- TDS Category: Highlights the tax category (e.g., Company, Individual).
- GSTIN: Displays the vendor’s GST Identification Number for compliance purposes.
-
Financial and Transaction Information:
- Payment Terms (pmt_terms): Shows the agreed payment terms with the vendor (e.g., 30 days, 60 days).
- Balance: Displays the current balance or outstanding amount with the vendor.
- GL Account ID: Links to the General Ledger account associated with the vendor.
- GL Account Name: Provides the name of the linked GL account.
-
Additional Details:
- Reference Number (ref_no): Reference number for internal tracking.
- Notes (note): Includes any additional comments or information related to the vendor.
-
Summary Totals:
- At the bottom of the list, summary totals are displayed, such as the total balance and the total number of vendors.
How to Use the Vendor List
-
Access the Vendor List:
- Navigate to the Vendor List section under the Vendor in the Ace CBM dashboard.

- Navigate to the Vendor List section under the Vendor in the Ace CBM dashboard.
-
Search and Filter Options:
- Use the Search Bar to locate specific vendors by Account ID, Name, or PAN.
- Apply filters for:
- Vendor Type: Filter vendors based on categories like General, Raw Material, Job Work, etc.
- TDS Applicable: View only those vendors for whom TDS is applicable.
- Use the tabs at the top to view specific groups, such as Raw Material or Consumable & Others.
-
Sort and Organize Data:
- Sort records by clicking on column headers like Balance, Payment Terms, or Vendor Name.
-
Export Data:
- Click the Export button to download the vendor list for reporting or sharing with your team.
-
Pagination and Row Display:
- Adjust the Rows per Page setting to view more or fewer records at a time.
- Navigate through pages using the pagination controls at the bottom.
Ace CBM’s Vendor List module empowers businesses to manage vendor relationships effectively, ensuring smooth procurement and financial processes.